✽ workflow for test manufacturers
Test Adaptation
Request an adapter for your test cassette
Contact us to get an adapter with which you can create calibration data. Also here you can ask for a Igloo reader devices if it your initial request.
Test calibration
Follow the instructions to create a calibration for your test and upload it to Cloud. We are always in touch to avoid mistakes.
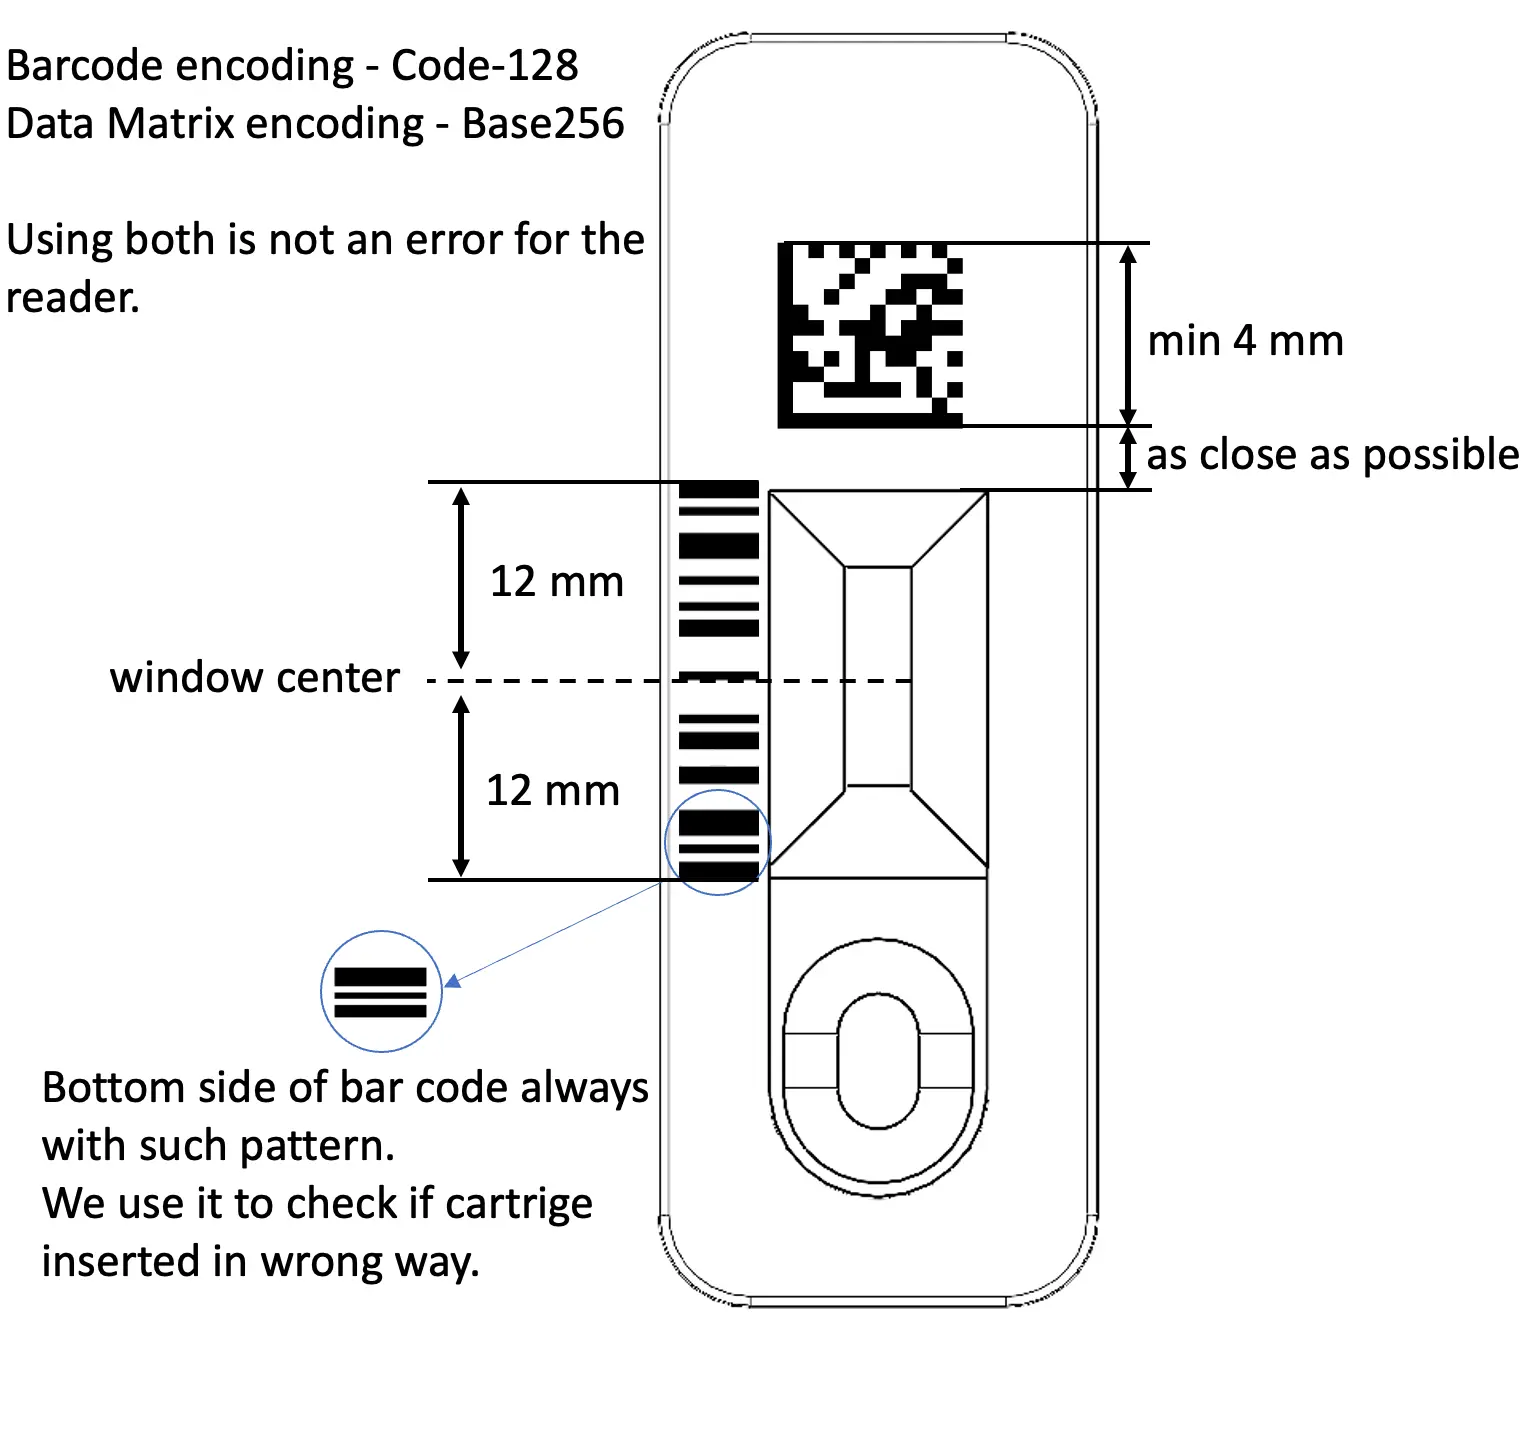
Place barcode on the cartrige
Implement a barcode or date matrix application in the print program on your test cassettes for identification by the device.
Tests at the user
The end user uses the tests and the device automatically takes calibration data from the cloud.
Exclusive Insights
We gather statistics for you on the tests made to help you better predict production.
✽ soon to be available in your personal account
Step 1 | Request an adapter for your test cassette
Dear test manufacturer, welcome to the initial step to start selling your tests along with our devices. Please fill out the form in order for us to start the process of calibrating your tests.
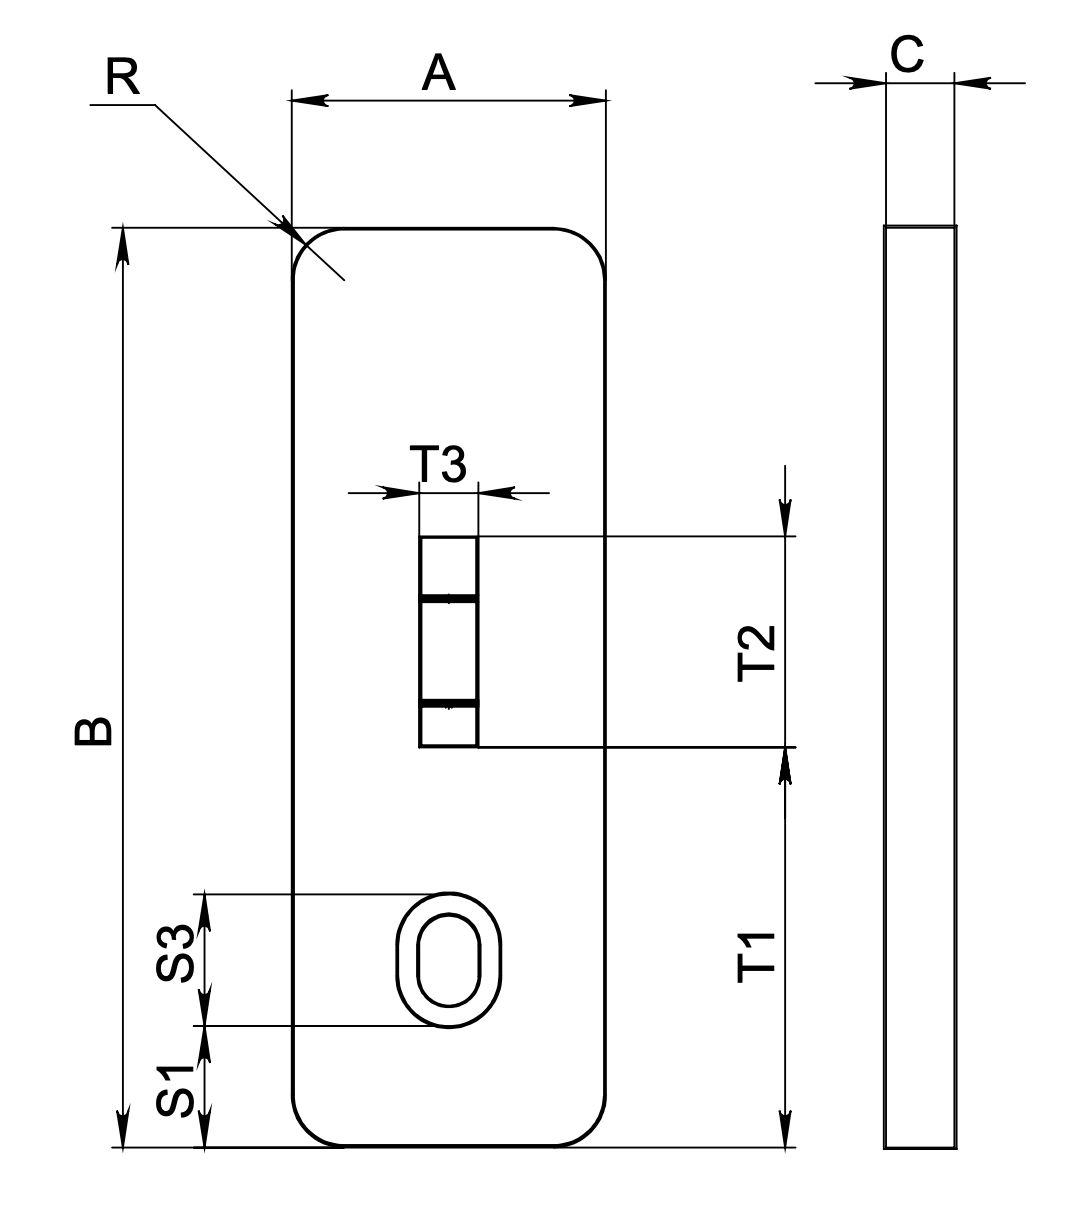
Dimensions of the test cassette
Fill out the form with the dimensions. We will print the adapter that you will use with your test. It is necessary for correct positioning of the test cassette in the device.
Request Form
Step 2 | Test Calibration
1. Download and install Dx Studio
The software applications need to interact with Igloo in order to process the obtained data. Install Dx Studio on your computer or laptop. Dx Studio is available for Windows and MacOS.
2. Before you begin
Prepare a work area for your Igloo. Place Igloo on a flat surface away from any liquids as they could damage the device. The work area should have enough free space to be able to easily insert and eject the test cassette adapter (cartridge).
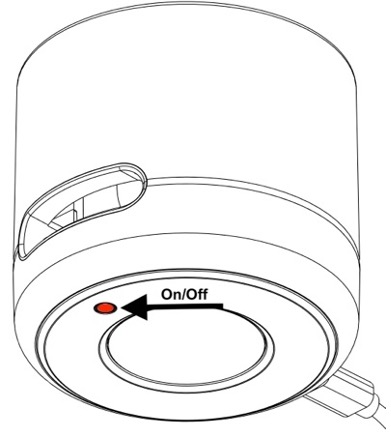
To turn Igloo on, press the button on the bottom of the device. Connect the device to your computer with a USB cable.
3. Calibration
Select Laboratory mode. The Laboratory mode is intended for calibration, cv (coefficient of variation) and clinical studies.
Click New project.
The application will prompt you to connect the device unless it is already connected. Dx Studio and Igloo will connect automatically.
Before starting the calibration, make sure that you have prepared test cassettes with different known concentrations.
Fill in Laboratory Project. Specify the test information: Test name, LOT number, REF number, Cartridge Type, Measurement Type and Expiration date. Choose a folder on your computer to save the project.
To achieve greater accuracy, we recommend using time-resolve fluorescense instead of plain fluorescense to measure fluorescent strips. You can also check which method works better by doing two studies with different types of measurements.
In addition to the regular cartridge you can also build calibrations for dip-stick and dry-chemistry cartridges. In case your cartridge has a non-standard design or wavelengths, please contact us. We are actively working on adopting new cassettes for our reader.
The application will open Cartridge profile. Follow the application prompts.
Place one test cassette into the cassette adapter with the test strip facing up and insert them together into the device slot according to the adapter direction. The sample well of the test cassette must remain outside the device.  The application will show a photo of the test and it will prompt you to select the area of the strip.
Please move the strip area window to exactly match the test tape window.
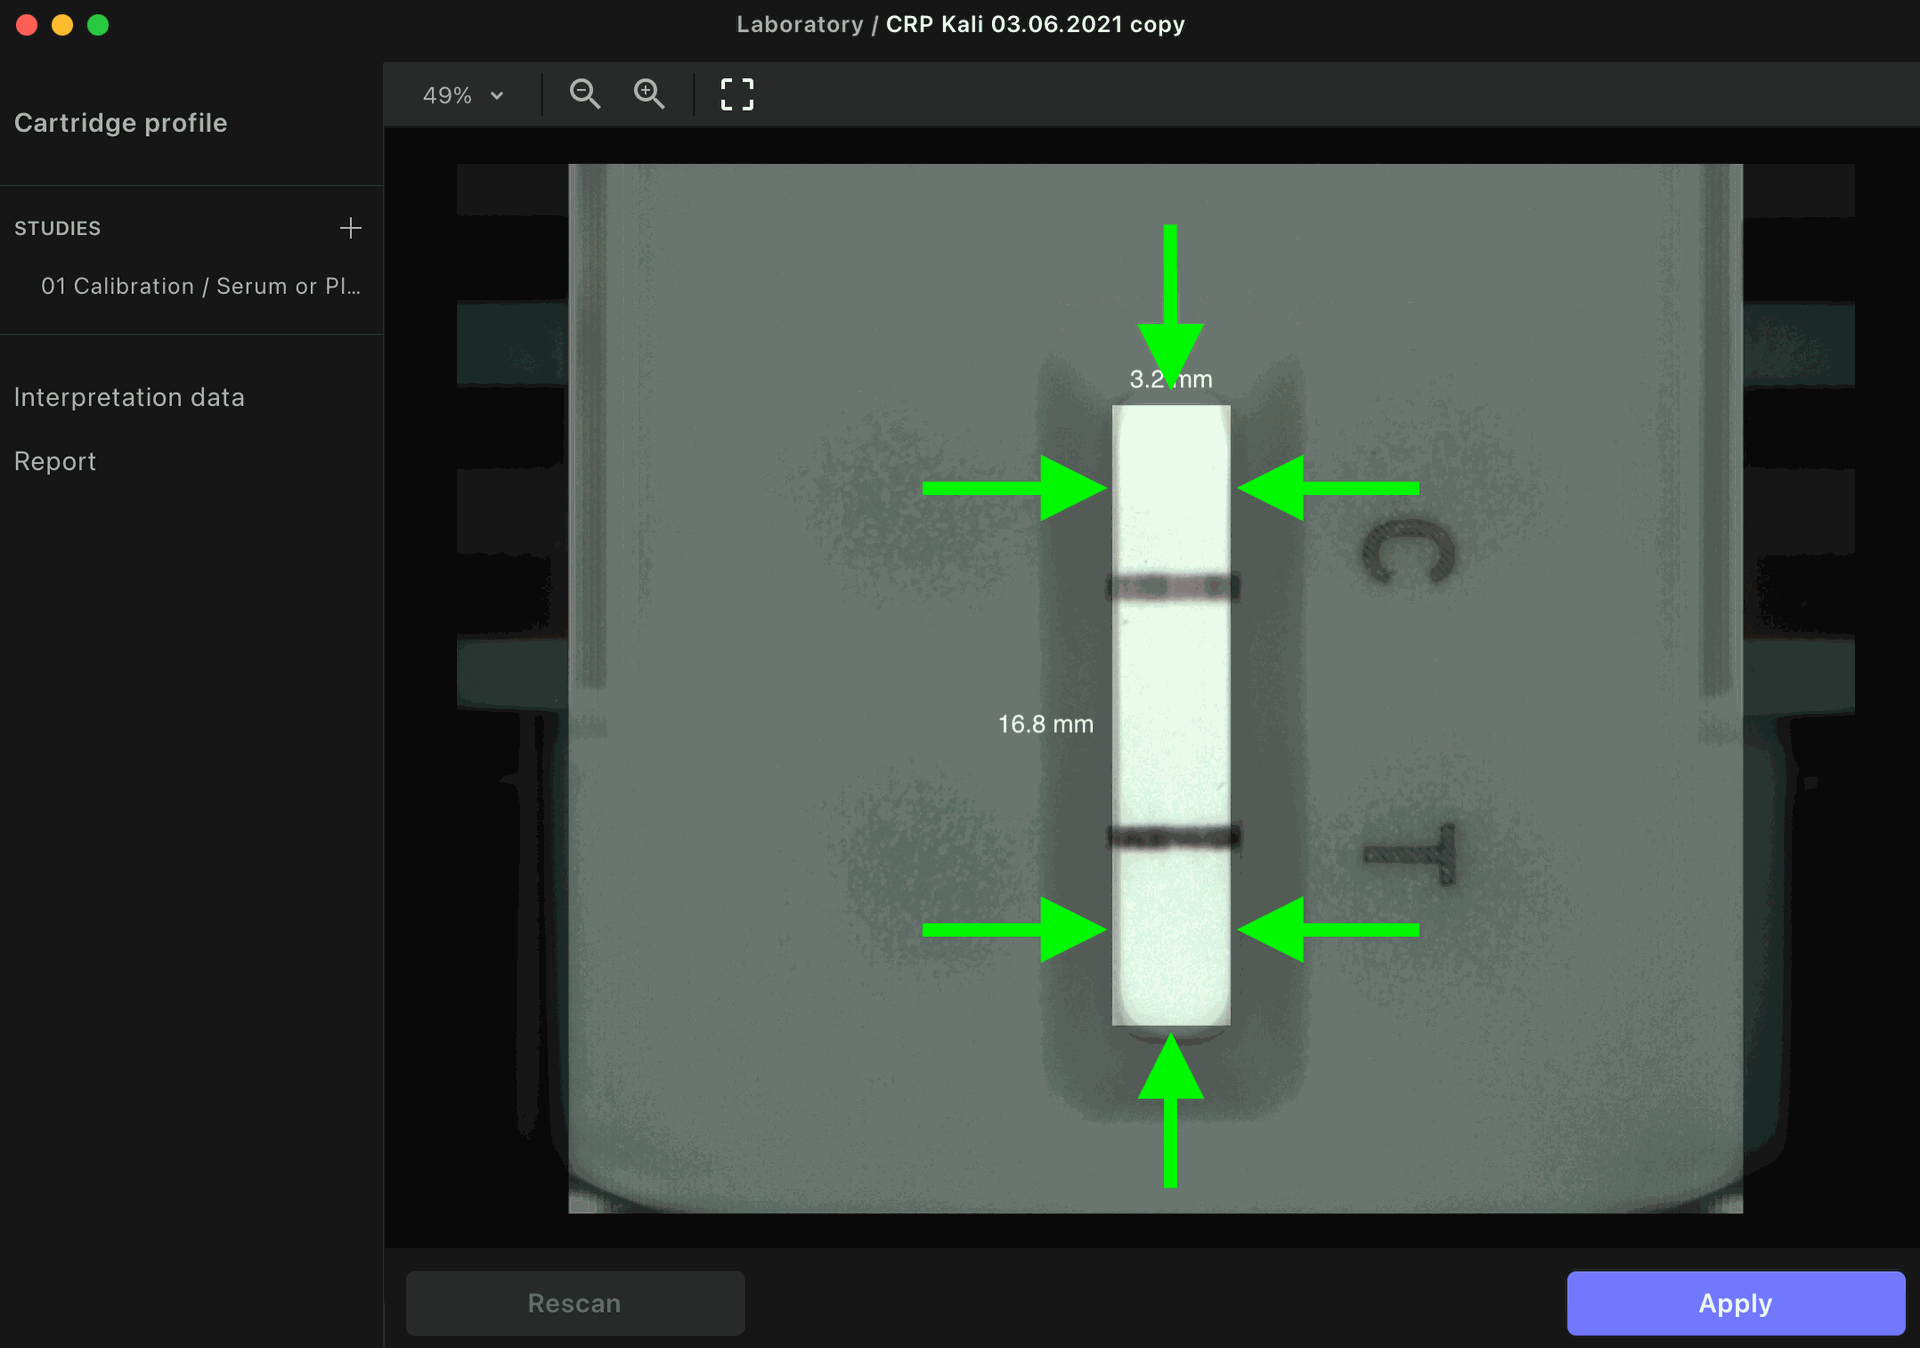
And it will prompt you to select the area of the strip. Please move the strip area window to exactly match the test tape window. To delete a test line, select it and press backspace on the keyboard.
Important: we recommend to select the width of the test line 0.2 mm from the edge of the current line on the image to avoid inaccuracies in line drawing. To do this, first select the line exactly along its visible edges and then stretch the window by 0.2 mm up and down.
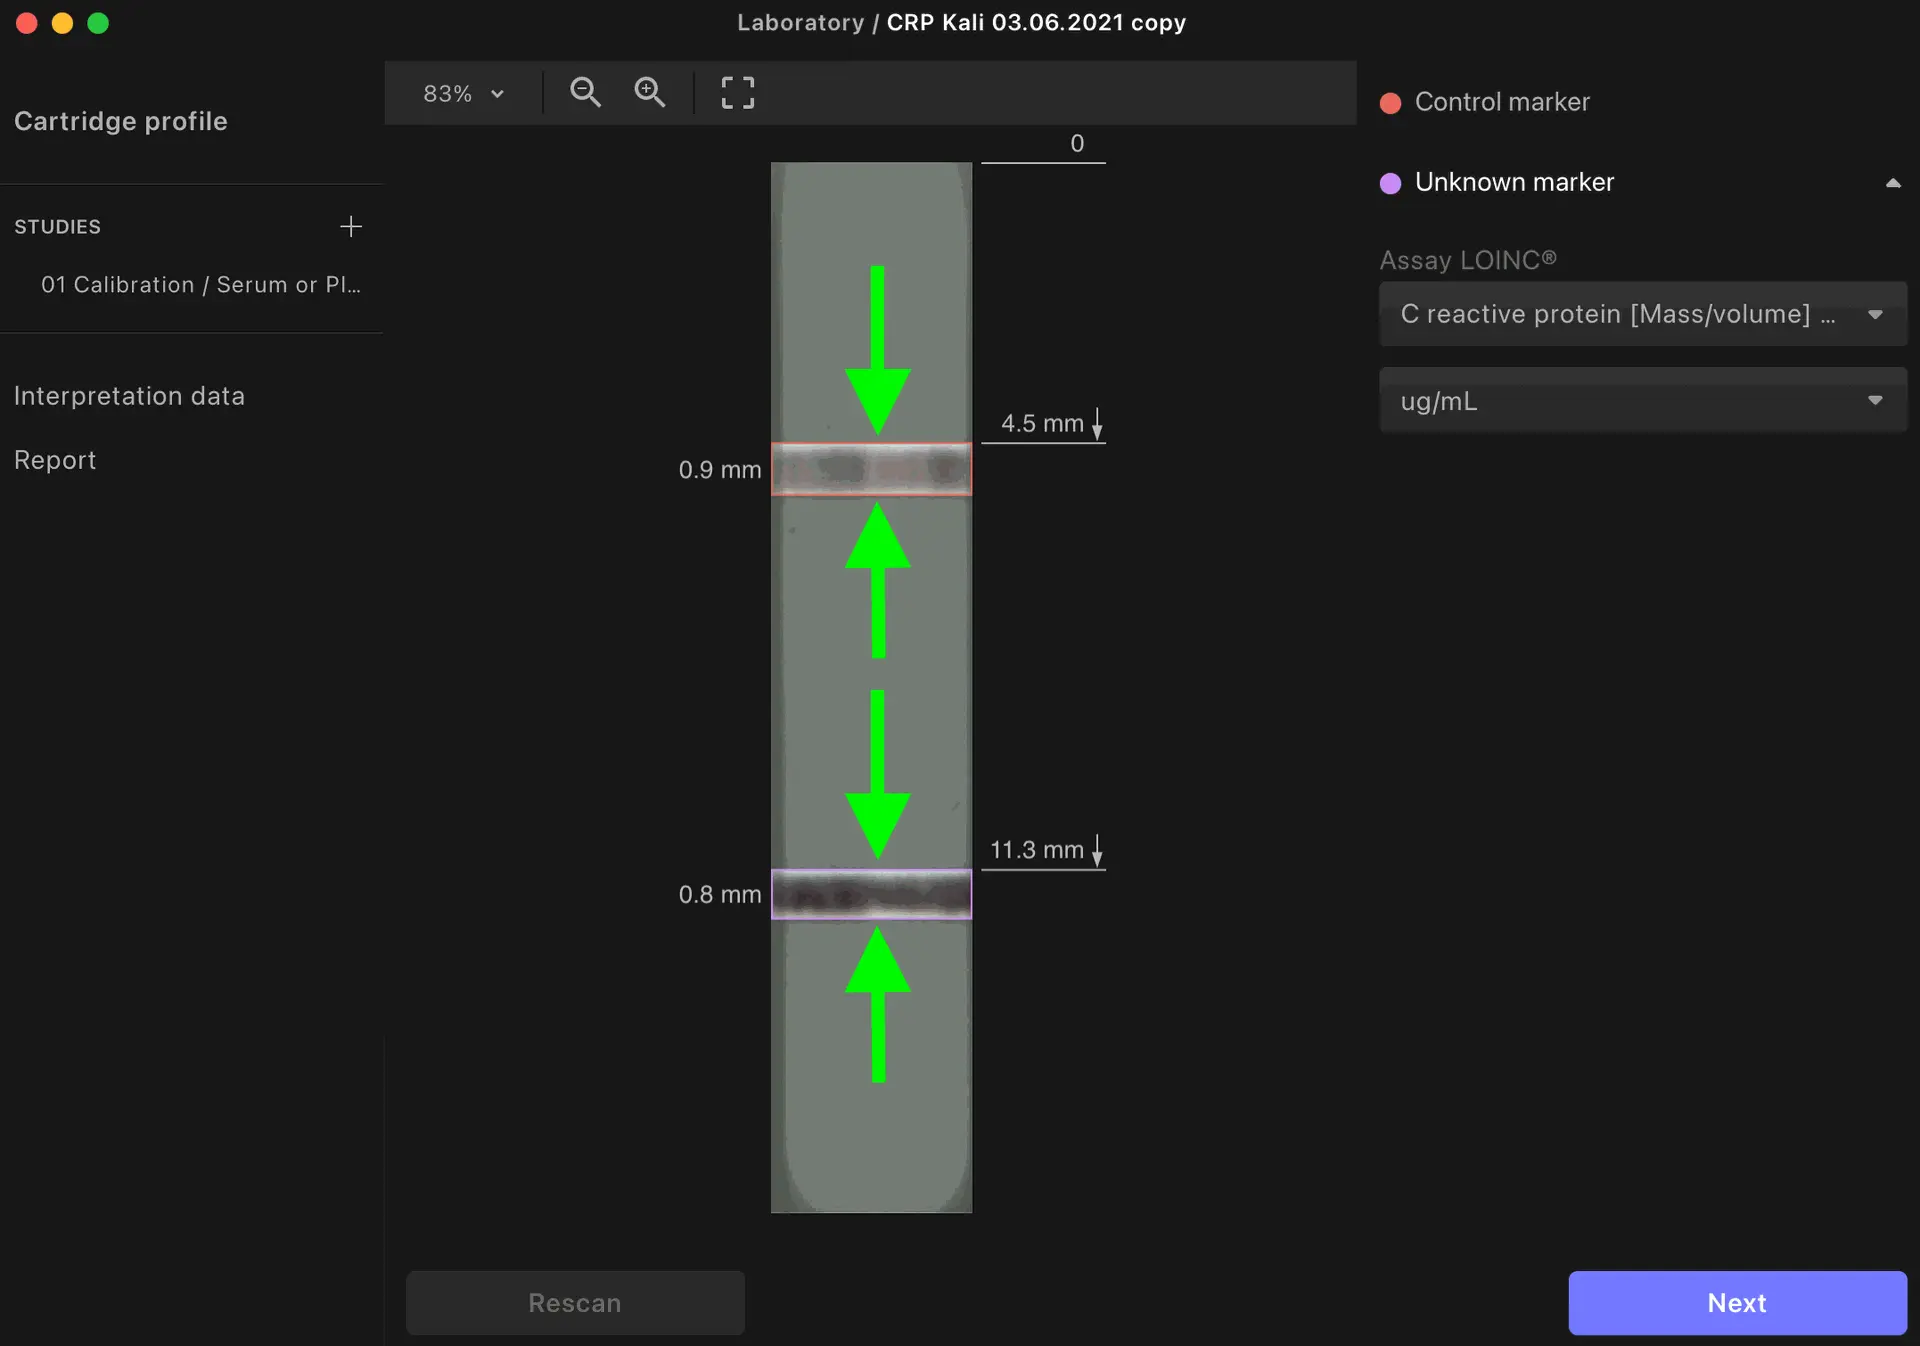
Select the basic data for the assay: test name per LOINC guide and units. Move to the next page by clicking Next.
Once you have selected the strip area and the control and test markers and made measurements they cannot be changed. If you have done a study and do not want to lose data, please contact us and we will try to correct the measurement areas for you.
Select Calibration for the type of study, choose Measurement type and Specimen type. Fill in the data for various concentration values, including the required sample volume and buffer volume.
It is recommended to fill in at least six (6) different concentration values. The application will prompt to insert test cassettes with different concentrations one after another in line with the concentration Values and the Number of repetitions for each of them according to your Study.
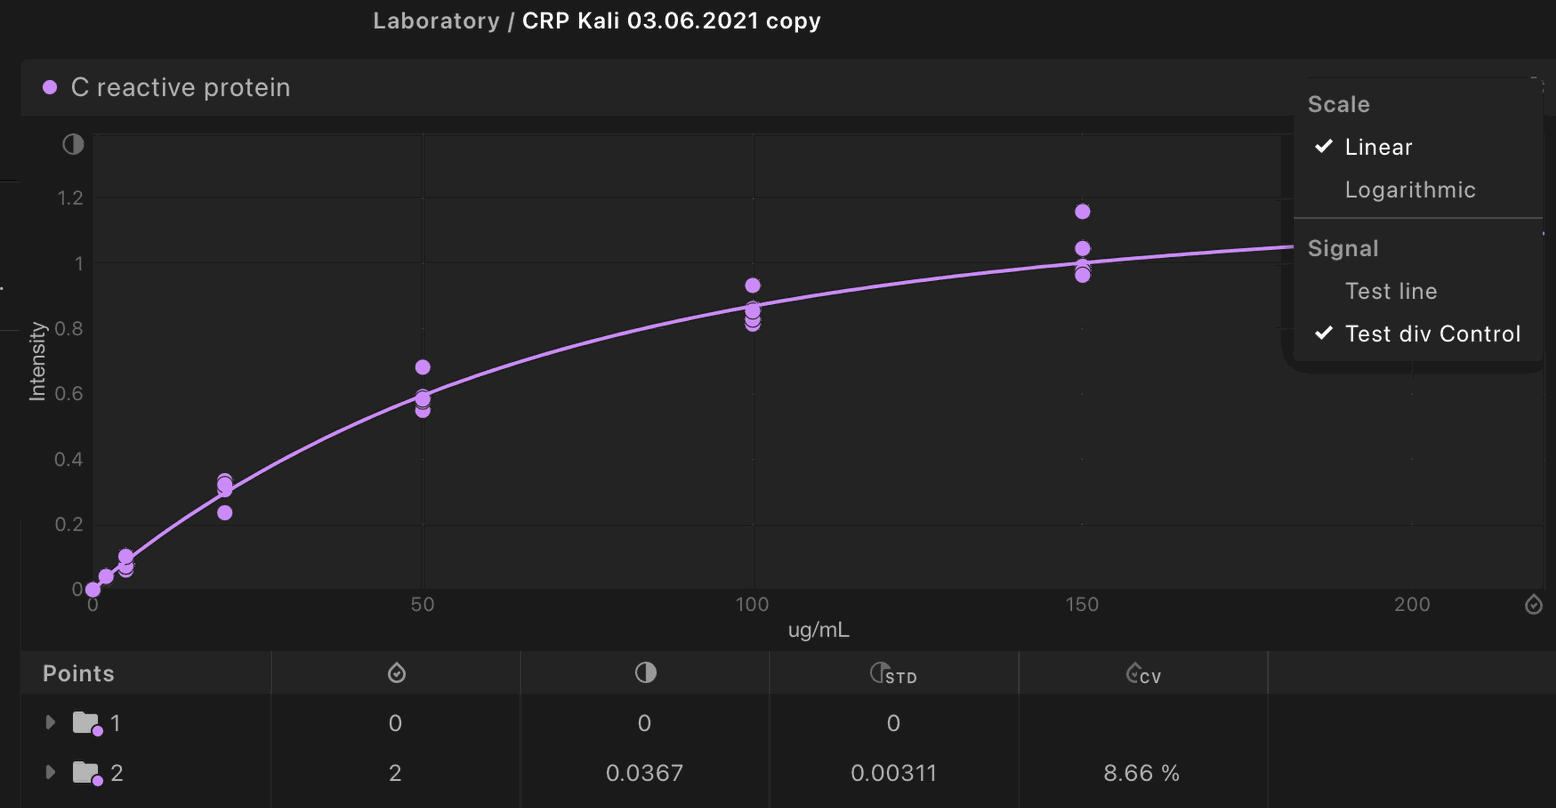
Complete the measurements. The application will then create the calibration curve on the Workspace page. You can always go back to the Study page and correct the data if needed.
We recommend using the mode test line divide by control line - this will increase the accuracy of the test measurement. This setting is located in the menu with a gear in the upper right corner of the chart.
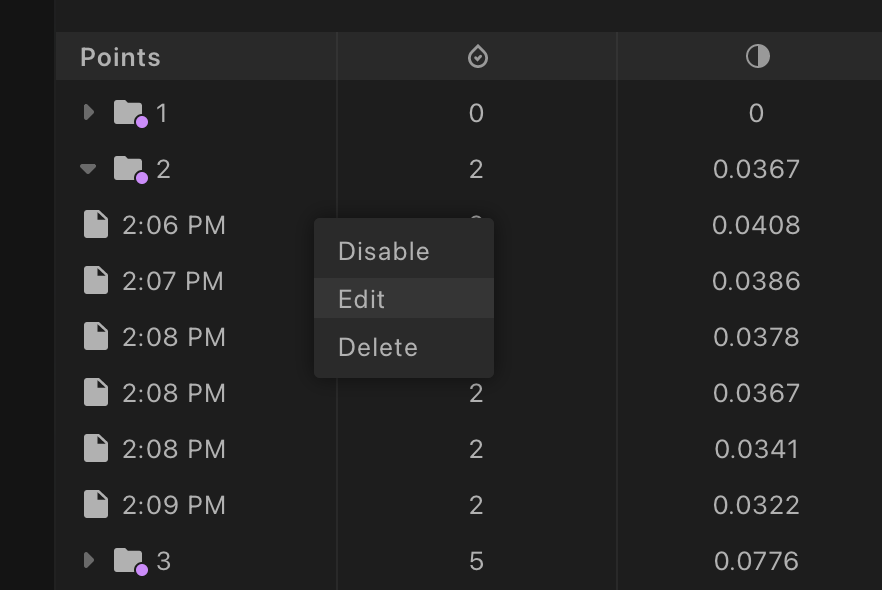
You can deactivate, change or delete an individual measurement from the table by right-clicking on it.
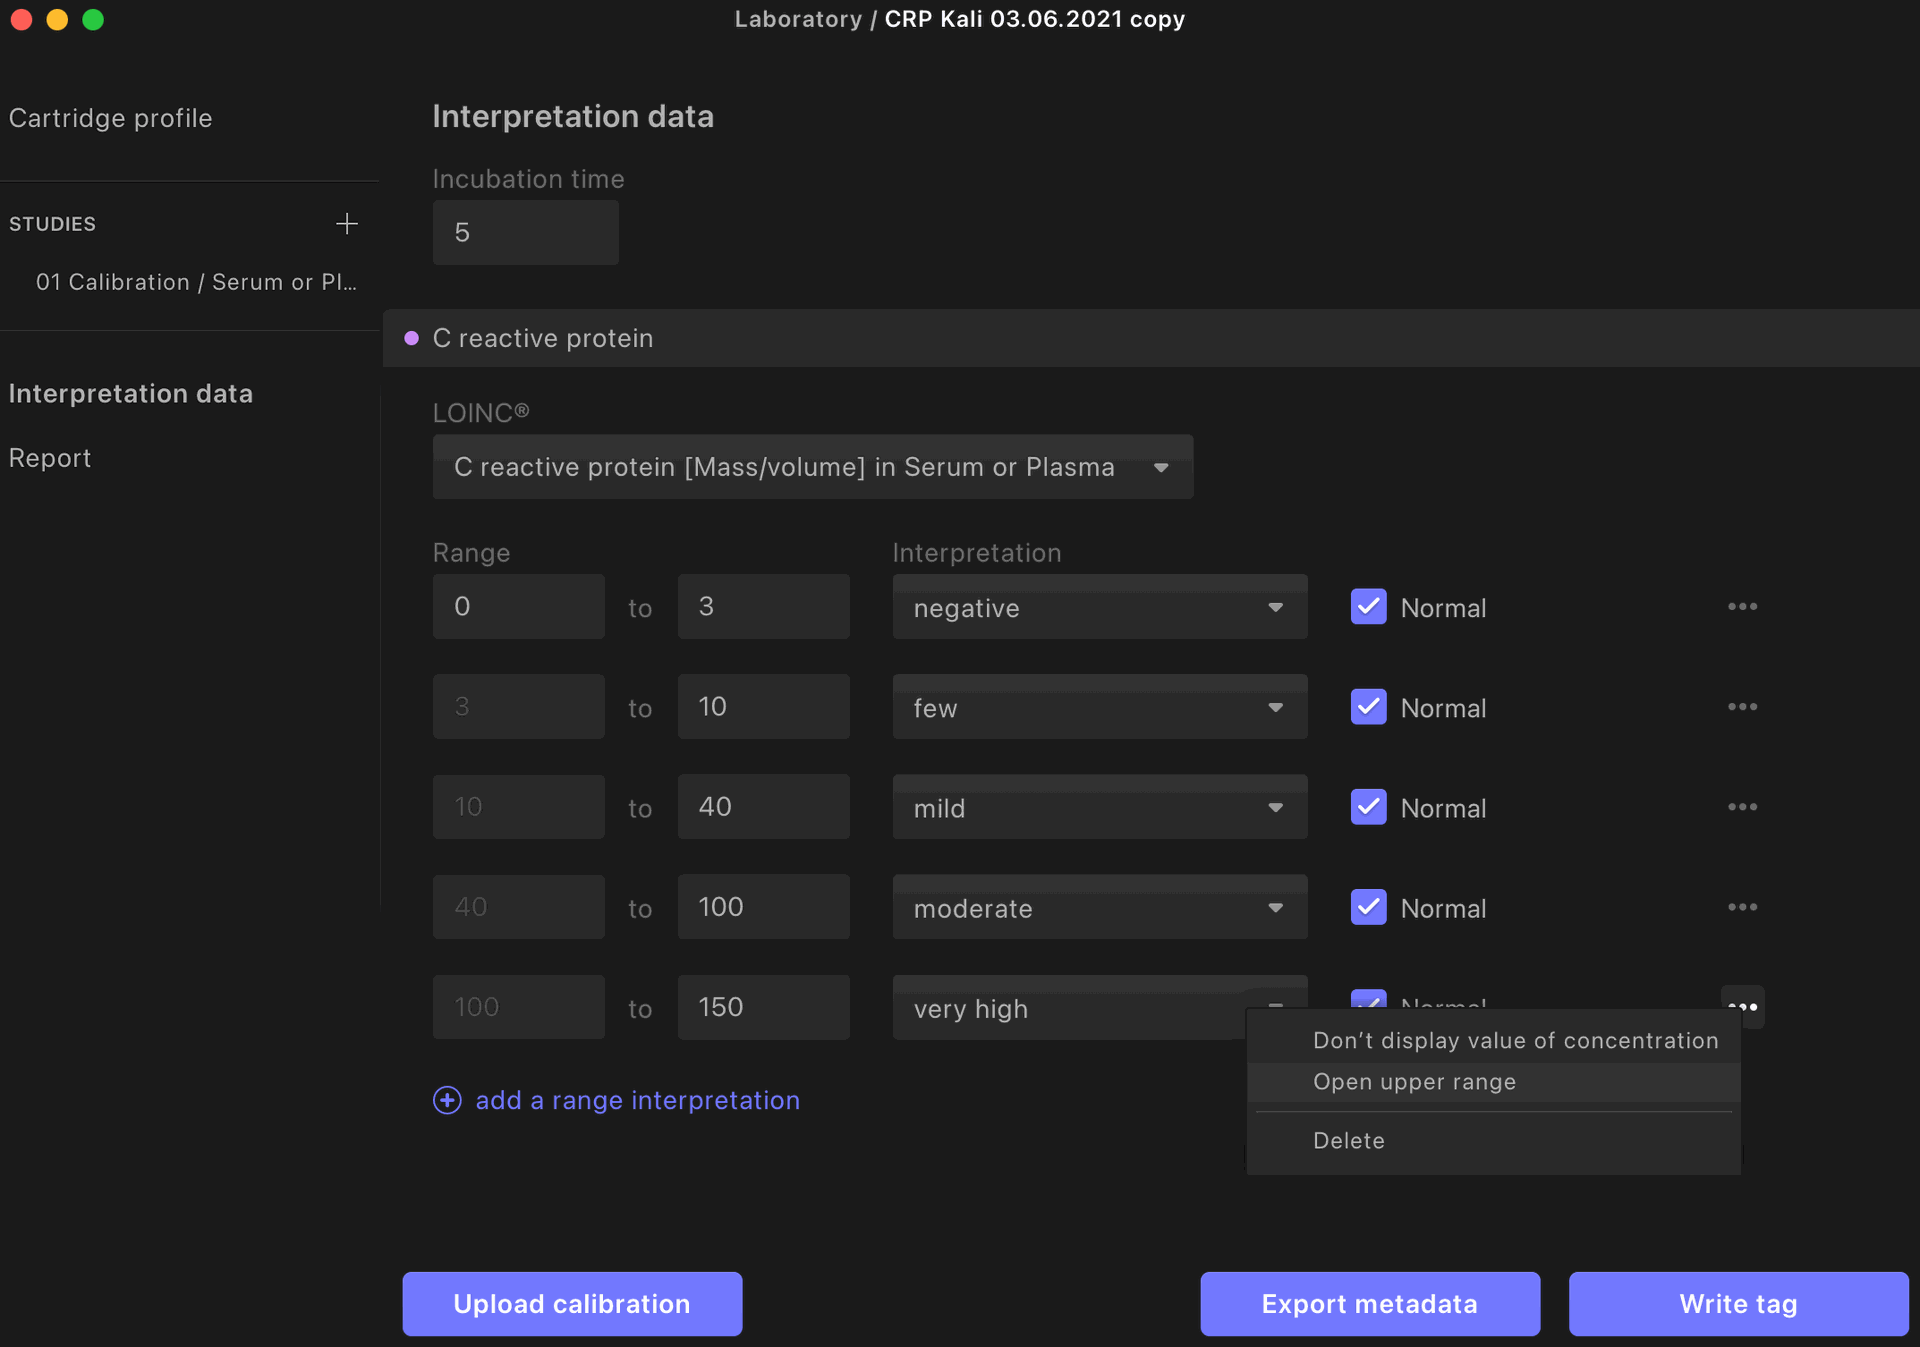
Enter Incubation time and Range Interpretation (Reference Value) on the Interpretation data page and mark the checkbox next to the Range that is considered Normal for the test type in question. In the menu with three dots opposite each interpretation you can select additional options: do not show the concentration value, open upper/lower limit (example <500ng/ml), and delete the interpretation.
Save your project in the drop-down menu File -> Save Project
You can view and export the automatically generated calibration report under the Report tab.
4. Upload calibration data to cloud
Go to the link https://service.dx365.world/ to the personal account of the test manufacturer. Enter the access key received by mail.
Create new Id for future LOT: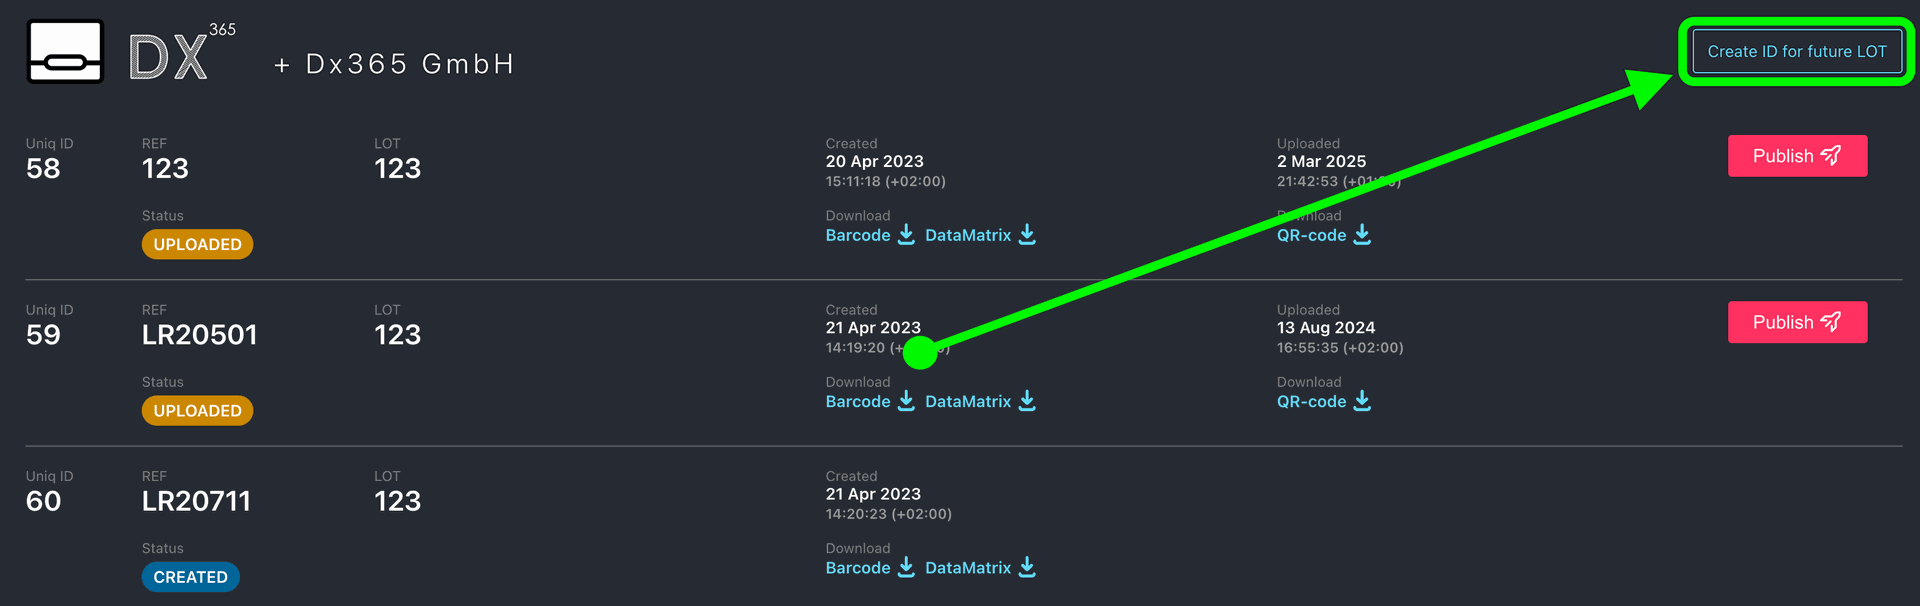
LOT and REF shold be the same as in project. After completing form push create button:
Go Back to Dx Stupio App with your opened project. Open Interpretation Data panel, push Upload Calibration button, incert Access key to Token input and push Upload.
You will see a message that the calibration data has been successfully uploaded to the cloud.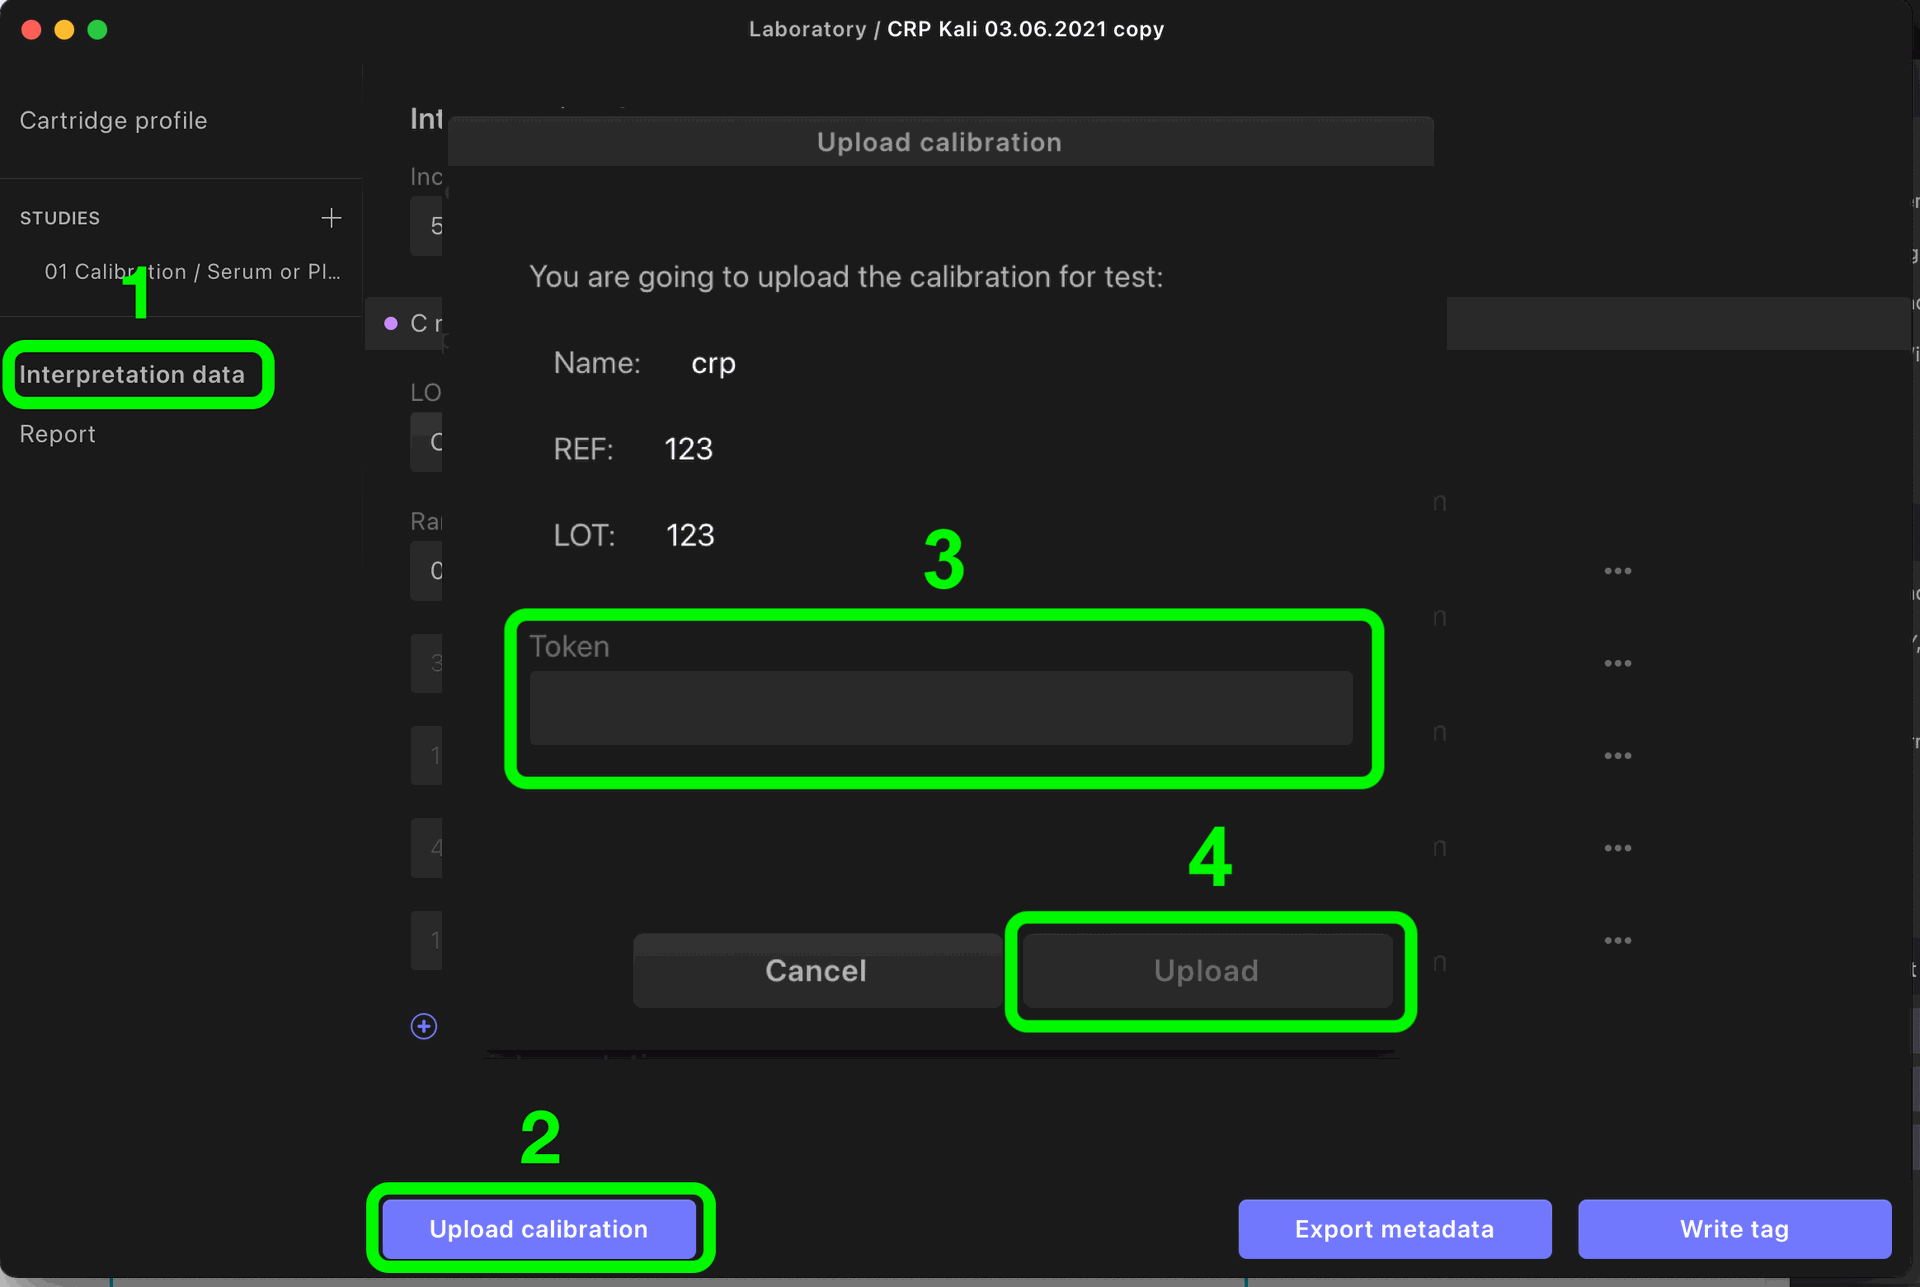
You can now download and use the barcode or datatrix downloaded from the test manufacturer's personal account to print on test cassettes. The first test is recommended to print the barcode on a sticker and apply it to the adapter. This will save you time in testing.

5. Check calibration
Please download and install end-user application for Igloo - Dx Care by this link:
How to make a measurement with Igloo
Please take 3-10 measurements of the test by checking:
- low, medium and high concentration of the biomarker;
- there are no errors in the measurement;
- the incubation time is set correctly;
- interpretations are set correctly.
Feel free to contact us with any questions.
Step 3 | Place barcode on cartridge
Verification request
Important: After printing the barcode on the casette – please check 3 different test casetts with reader to be sure that that everything is readable by the device and the laser intensity doesn't fluctuate.
Lines that are too thick or poorly visible may not be read by the reader.
Please complete verification form!
Instruction